

The cost of machine polishing can vary significantly based on several factors, including the type of machine, the scope of the project, and the location. Here are some general price ranges and considerations:
Machine Polishing for Cars
Basic Polishing: The average cost for basic machine polishing for a car typically ranges between $50 and $100. This price can vary based on the size of the vehicle, the specific polishing techniques used, and the overall condition of the car's paint.
Stage 2 Machine Polish: More comprehensive polishing services, such as a two - stage machine polish, can cost around $250. This service includes a cutting stage to remove severe imperfections and a refining stage to enhance gloss and clarity.
Machine Polishing Services
Professional Services: The cost of machine polishing services can range from $25 to $250, depending on the extent of the work required and the quality of the service provider. For example, a single - stage machine polish might cost around $25, while a more advanced two - stage polish could cost up to $250.
Ceramic Protection: In addition to polishing, ceramic coatings are often applied to protect the paint. The cost for a 1 - year ceramic coating can range from $295 to $895, depending on the size of the vehicle.

Machine Polishing Equipment
Entry - Level Machines: For DIY enthusiasts or small - scale operations, entry - level machine polishers can start at around $500. These machines are suitable for basic polishing tasks.
Mid - Range Machines: Machines suitable for small to medium businesses may cost between $2,000 and $10,000. These machines offer more advanced features and higher efficiency.
High - End Industrial Machines: For large - scale operations, high - end industrial polishers can range from $10,000 to over $100,000. These machines are designed for high - volume production and often come with advanced automation and precision features.
Factors Affecting Cost
Type of Machine: Rotary, vibratory, belt, and automated machines all have different price ranges. Rotary machines are generally more affordable, while automated machines are the most expensive.
Brand and Manufacturer: Established brands with a reputation for quality and durability often command higher prices.
Region and Market Demand: Prices can vary widely based on the region. For example, machines in North America and Europe tend to be more expensive due to higher labor costs and advanced technology. In contrast, machines in Asia are often more affordable due to lower production costs.
how to clean machine polishing pads
To clean machine polishing pads effectively, follow these detailed steps and techniques:
General Cleaning Methods
1.Using Compressed Air:
Compressed air is a quick and effective way to clean all types of polishing pads. While the pad is on the polisher and spinning, aim the compressed air at the center of the pad and slowly work your way to the edge of the pad. This will blow out excess polish or compound.
2.Hand Washing:
Remove the Pad: Take the pad off the polisher.
Rinse with Warm Water: Rinse the pad under warm water to remove large debris and excess polish.
Apply Cleaner: Use a few drops of mild liquid soap or pad cleaner directly onto the pad.
Work the Cleaner In: Use your fingers to work the cleaner into the pad, focusing on areas with heavy buildup.
Rinse Thoroughly: Rinse the pad under running water to remove all cleaner and polish residues.
Dry Properly: Squeeze out excess water gently and lay the pad flat on a clean towel to air dry.
3.Machine Washing:
Remove the Pad: Take the pad off the polisher.
Rinse: Rinse the pad under warm water to remove large debris.
Use a Laundry Bag: Place the pads in a laundry bag to protect them during the wash cycle.
Set the Washing Machine: Use a gentle cycle with warm water and a small amount of mild detergent. Avoid fabric softeners.
Dry: Lay the pads flat on a clean towel to air dry.
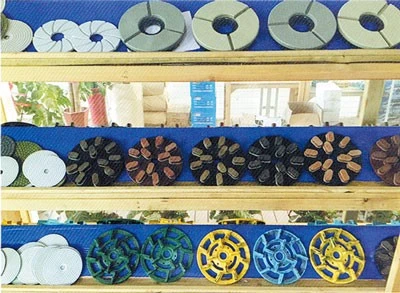
Specific Pad Types
1.Foam Polishing Pads:
Soak and Agitate: Soak the pad in warm, soapy water for 10-15 minutes. Agitate the pad gently to loosen any embedded polish or compound.
Rinse and Dry: Rinse thoroughly under running water and let it air dry.
2.Wool Polishing Pads:
Spur Tool: Use a spur tool to clean wool pads. Press the tool against the spinning pad and move it from the center to the edge to remove embedded products.
Compressed Air: Use compressed air to blow out deep - seated products from the wool fibers.
3.Microfiber Polishing Pads:
Compressed Air: Use compressed air to clean microfiber pads. This works whether the pad is wet or dry.
Bristle Brush or Cloth Towel: Use a bristle brush or cloth towel to wipe off excess compound during the polishing process.
how to machine polish
Machine polishing is a process that uses power tools to achieve a high - gloss finish on various surfaces, such as metals, plastics, and automotive paint. Here's a step - by - step guide on how to machine polish effectively:
Tools and Equipment Needed
Polishing Machine: A rotary polisher or dual - action polisher is commonly used.
Polishing Pads: Wool, foam, or microfiber pads are used depending on the surface and the stage of polishing.
Polishing Compounds: These come in different levels of abrasiveness, such as Tripoli for initial cutting and rouge for final finishing.
Safety Gear: Gloves, safety goggles, and a dust mask to protect against debris and chemicals.

Step - by - Step Guide to Machine Polishing
1. Preparation
Clean the Surface: Thoroughly clean the surface to be polished. Remove any dirt, grease, or contaminants that could interfere with the polishing process.
Inspect the Surface: Check for any deep scratches, oxidation, or other imperfections that may need to be addressed before polishing.
2. Select the Right Tools and Materials
Choose the Polishing Pad: Select a pad that matches the type of surface and the desired finish. For example, soft foam pads are ideal for fine polishing, while wool pads are better suited for rough surfaces.
Select the Polishing Compound: Use a cutting compound for initial stages to remove imperfections and a finishing compound for the final stages to achieve a high - gloss finish.
3. Polishing Process
Attach the Polishing Pad: Securely attach the chosen polishing pad to the machine.
Apply the Polishing Compound: Apply a small amount of polishing compound to the pad or directly onto the surface.
Start Polishing:
Set the Speed: Begin at a low speed to spread the compound evenly.
Polish in Sections: Work on small, defined areas to maintain control and achieve uniform results.
Apply Moderate Pressure: Use 15 - 20 lbs of pressure, allowing the pad to glide smoothly without excessive force.
Overlap Passes: Move the polisher in overlapping motions to ensure thorough coverage.
Adjust Speed and Pressure: Gradually increase the speed for cutting or decrease for finishing as needed.
4. Inspect the Surface
Periodically stop the polisher to assess your progress and make necessary adjustments. Use a clean microfiber towel to remove residue and reveal the polished surface.
5. Repeat as Needed
For deeper imperfections or a higher level of shine, reapply the compound and repeat the polishing process. Switch to a finer pad and compound for finishing stages.
6. Final Steps
Use a microfiber cloth to remove any residue and inspect the finish. Apply a protective coating to preserve the shine and prevent corrosion.
how to remove machine polish swirls
To remove machine polish swirls, you can follow these advanced strategies and techniques:
Understanding Swirl Marks
Swirl marks, also known as spider webbing or wash scratches, are fine, circular scratches that occur on the surface of automotive paintwork. They are typically caused by improper washing techniques, abrasive contaminants, or friction from towels or brushes during cleaning.
Advanced Polishing Techniques
1.Assess the Severity:
Determine the depth and severity of the swirl marks. Light swirl marks can be addressed with a fine abrasive compound and a foam polishing pad, while deeper swirls may require a more aggressive compound and a microfiber cutting pad.
2.Select the Right Tools:
Use a dual - action polisher with foam or microfiber pads for swirl mark removal. For deeper scratches, consider a rotary polisher paired with cutting pads.
3.Two - Step Method:
Initial Cutting Stage: Apply a cutting compound to the pad and work it into the surface using overlapping circular motions. Make several passes to gradually refine the finish.
Finishing Stage: Follow up with a finishing polish to remove any remaining swirl marks and achieve a high - gloss finish.
4.Multiple Passes Technique:
Make multiple passes with progressively finer abrasives and pads to refine the finish and eliminate swirl marks without causing additional damage to the paint.

Additional Tips
Work in Sections: Focus on small, manageable sections to maintain control and achieve uniform results.
Keep the Pad Wet: Ensure the polishing pad is consistently wet with the polishing compound to prevent heat buildup and additional scratches.
Avoid Direct Sunlight: Work in a shaded area to prevent the polishing compound from drying out too quickly, which can cause additional swirl marks.
When to Seek Professional Help
If the swirl marks are severe or below the clear coat, it may be necessary to consult a professional detailer or consider respraying the affected area.
how to use drill machine as polisher
Using a drill machine as a polisher is a cost-effective and versatile solution for achieving a high - gloss finish on various surfaces. Here's a step - by - step guide on how to effectively use a drill machine for polishing:
Tools and Accessories Needed
Drill Machine: A rotary or cordless drill with variable speed control.
Polishing Pads: Foam, microfiber, or wool pads suitable for different stages of polishing.
Polishing Compounds: Choose compounds based on the surface and the type of finish desired.
Safety Gear: Safety goggles, gloves, and a dust mask.
Step - by - Step Guide
1. Prepare the Surface
Thoroughly clean the surface to be polished, removing any dirt, dust, or debris. Use a mild detergent and water solution or a surface cleaner suitable for the material.
Let the surface dry completely before proceeding.
2. Attach the Polishing Pad
Choose the appropriate polishing pad for your drill machine and attach it securely to the drill's chuck or backing plate. Ensure the pad is centered and firmly attached to avoid any wobbling or spinning issues during polishing.
3. Apply Polishing Compound
Apply a small amount of polishing compound or wax onto the surface or directly onto the polishing pad. Use a low speed setting on the drill machine to spread the compound evenly over the surface before increasing the speed.
4. Start Polishing
Hold the drill machine steadily with both hands and start polishing the surface using slow, overlapping passes. Apply even pressure and keep the drill in motion to avoid overheating or damaging the surface. If using a random orbital drill, move the pad in small circular or back - and - forth motions to achieve the best results.
5. Inspect and Repeat
Periodically stop and inspect the progress of the polishing. Adjust the speed, pressure, or amount of polishing compound if necessary. If the desired level of polish is not achieved in the first attempt, repeat the process with a more aggressive polishing pad or compound as needed.
6. Clean the Surface
After polishing, clean the surface once again to remove any residual polishing compounds or waxes. Use a microfiber cloth or a clean, soft cloth to wipe away the residues.
how to make a buffing and polishing machine
To make a buffing and polishing machine, you can follow a DIY approach using common materials and tools. Here's a step-by-step guide based on the principles of buffing and polishing:
Materials and Tools Needed
Electric Motor: A small electric motor (e.g., from an old drill or a similar device).
Polishing Pads: Foam, microfiber, or wool pads suitable for different stages of polishing.
Polishing Compounds: Choose compounds based on the surface and the type of finish desired.
Mounting Plate: A flat metal or plastic plate to mount the motor and pad.
Clamps or Screws: To secure the motor to the mounting plate.
Safety Gear: Safety goggles, gloves, and a dust mask.

Step-by-Step Guide
1. Prepare the Motor
Select the Motor: Choose a small electric motor with a suitable speed range for polishing. A motor from an old drill or a similar device can be repurposed.
Mount the Motor: Attach the motor to a flat mounting plate using clamps or screws. Ensure the motor is securely fastened and can rotate freely.
2. Attach the Polishing Pad
Prepare the Pad: Choose the appropriate polishing pad for your project. Foam pads are good for general polishing, while wool pads are better for more aggressive tasks.
Secure the Pad: Attach the polishing pad to the motor's shaft. You may need to create an adapter or use a backing plate to ensure the pad is securely mounted.
3. Set Up the Work Area
Clean the Surface: Thoroughly clean the surface to be polished, removing any dirt, grease, or contaminants.
Inspect the Surface: Check for any deep scratches, oxidation, or other imperfections that may need to be addressed before polishing.
4. Polishing Process
Apply Polishing Compound: Apply a small amount of polishing compound to the pad or directly onto the surface.
Start Polishing: Turn on the motor and begin polishing the surface using overlapping circular motions. Apply even pressure and keep the pad moving to avoid overheating or damaging the surface.
Inspect and Repeat: Periodically stop to inspect the surface. If necessary, repeat the process with finer pads and compounds to achieve the desired finish.
how to polish a gemstone on a faceting machine
To polish a gemstone on a faceting machine, follow these detailed steps:
Step-by-Step Guide to Polishing a Gemstone on a Faceting Machine
1. Prepare the Gemstone
Clean the Stone: Thoroughly clean the gemstone to remove any dirt or debris.
Inspect the Stone: Examine the rough gemstone for inclusions, color banding, and natural shape to determine the best cut.
2. Dopping the Stone
Attach the Stone to the Dop Stick: Use a special high - temperature wax to attach the gemstone to the dop stick. The flat top of the dop stick should match the flat table facet on the stone.
3. Cutting the Stone
Set Up the Faceting Machine: Ensure the machine is properly set up with the appropriate lap and cutting tools.
Cut the Facets: Begin by cutting the pavilion facets (the bottom part of the stone) using a grinding lap. Each facet should be cut at the correct angle, which is set using the machine's angle protractor and hand set.

4. Polishing the Facets
Switch to Polishing Lap: Once all facets are cut, switch to a polishing lap. This lap is finer and is used to polish each facet to a high shine.
Apply Polishing Compound: Use a polishing compound suitable for the type of gemstone. Diamond paste is commonly used for its effectiveness in smoothing and shining the surface.
Polish Each Facet: Individually polish each facet using the polishing lap. Ensure each facet is smooth and reflective. Pay attention to the angles and pressure to achieve a uniform finish.
5. Transfer and Polish the Crown
Transfer the Stone: After the pavilion is polished, transfer the stone to another dop stick to polish the crown (the top part of the stone). The second dop stick will have a "V" - shaped notch to match the stone's base.
Polish the Table and Crown Facets: Use a 45 - degree dop holder to reach the table facet and polish it first. Then, polish the remaining crown facets.
6. Final Inspection and Cleaning
Inspect the Stone: Carefully inspect the gemstone to ensure all facets are polished and free from imperfections.
Clean the Stone: Remove any remaining wax by gently heating the stone. Most of the wax can be washed off by soaking the stone in alcohol.


