


A masonry drill bit is a specialized type of drill bit designed specifically for drilling into hard materials like concrete, brick, stone, and mortar. These bits are engineered to withstand the high levels of abrasiveness and hardness found in masonry materials, making them essential tools for construction, renovation, and DIY projects involving these materials.
Key Features of Masonry Drill Bits
1.Carbide Tipping:
Material: Masonry drill bits typically have carbide tips. Carbide is an extremely hard material that can withstand the high resistance and abrasiveness of masonry.
Durability: The carbide tips ensure that the bits maintain their sharpness and cutting ability even when drilling through tough materials like concrete and brick.
2.Flute Design:
Spiral Flutes: Masonry bits often have wide, deep spiral flutes that help remove debris and dust efficiently. This design prevents the bit from getting clogged, which is crucial when drilling into materials that produce a lot of dust.
Clearance: The flutes are designed to provide ample clearance for dust and debris, ensuring smooth drilling and reducing the risk of overheating.
3.Shank Design:
Standard Shanks: Many masonry bits come with standard shanks that fit into most power drills.
Specialized Shanks: Some masonry bits have specialized shanks, such as SDS (Special Direct System) shanks, which are designed for use with hammer drills. These shanks provide a more secure fit and better performance in hammer drilling applications.
Types of Masonry Drill Bits
1.Twist Masonry Bits:
Design: These bits have a twist design similar to standard drill bits but with carbide tips.
Usage: Suitable for general-purpose drilling in masonry materials. They are effective for creating holes for anchors, screws, and dowels.
2.SDS Masonry Bits:
Design: SDS bits have a specialized shank that fits into SDS hammer drills. These bits are designed for heavy-duty applications and provide better performance in hammer drilling.
Usage: Ideal for drilling larger holes and deeper holes in concrete, brick, and stone. They are commonly used in construction and renovation projects.
3.SDS-Plus Masonry Bits:
Design: SDS-Plus bits have a slightly larger shank than SDS bits, providing even greater durability and performance.
Usage: Suitable for heavy-duty applications and drilling larger holes in masonry materials.
4.SDS-Max Masonry Bits:
Design: SDS-Max bits are the largest and most durable type of masonry bits. They are designed for use with high-power SDS-Max hammer drills.
Usage: Ideal for drilling very large holes in concrete, brick, and stone. These bits are commonly used in commercial and industrial applications.

Tips for Using Masonry Drill Bits
1.Use a Hammer Drill:
For best results, use a hammer drill with a masonry bit. The hammering action helps break through the material more efficiently.
2.Apply Cutting Oil:
When drilling into masonry materials, use a cutting oil or water to lubricate the bit. This helps reduce heat buildup and prolongs the life of the bit.
3.Clear Debris Regularly:
Periodically withdraw the bit to clear out dust and debris. This helps prevent clogging and ensures smooth drilling.
4.Maintain Proper Pressure:
Apply steady, consistent pressure while drilling. Avoid pressing too hard, as this can cause the bit to bind or break.
5.Safety Precautions:
Always wear safety goggles and gloves to protect yourself from flying debris and sharp edges. Use a dust mask to avoid inhaling dust particles.
what to spray on drill bit for brick
When drilling into brick, using a lubricant on the drill bit can significantly improve the drilling process and reduce the risk of damaging the brick or the bit. Here are some recommended options and tips:
Recommended Lubricants for Drilling Brick
1.Water:
Usage: Applying water to the drill bit while drilling can help reduce heat buildup and friction. This is particularly useful for dense or older bricks that are prone to cracking.
Application: Use a spray bottle to periodically mist the drill bit and the drilling area with water. This keeps the bit cool and allows for smoother progress.
2.Cutting Oil:
Usage: Cutting oil is another effective lubricant for drilling into brick. It helps reduce friction and heat, extending the life of the drill bit.
Application: Apply a small amount of cutting oil to the drill bit before starting. Reapply as needed during the drilling process.

3.Specialized Lubricants:
Usage: Some specialized lubricants are designed specifically for masonry work. These can provide better performance than general-purpose oils or water.
Application: Follow the manufacturer's instructions for application. Typically, these lubricants are applied directly to the drill bit and the drilling area.
what is drilling bit
A drilling bit is a cutting tool used to create holes in various materials such as wood, metal, plastic, and masonry. It is designed to penetrate the material by applying pressure and rotation, removing material to form a hole. Drilling bits come in a wide range of sizes and materials, each suited for specific applications.
Key Features of Drilling Bits
1.Material:
High-Speed Steel (HSS): Most common material for general-purpose drilling. It is durable and heat-resistant, making it suitable for drilling through wood, metal, and plastic.
Carbide-Tipped: Carbide-tipped bits are harder and more durable, ideal for drilling through hard materials like concrete and masonry.
Cobalt Steel: Offers better performance in harder metals and maintains its cutting edge longer than HSS.
2.Size:
Diameter: Available in various sizes, from small bits for fine work to larger bits for heavy-duty applications.
Length: The length of the bit can vary depending on the depth of the hole required.
3.Design:
Flutes: The spiral grooves that help remove material as the bit drills into the workpiece.
Point: The tip of the drill bit, designed to penetrate the material smoothly and efficiently.
Shank: The part of the bit that fits into the chuck of the drill.
Types of Drilling Bits
1.Twist Drill Bits:
Description: The most common type, featuring a spiral flute design for efficient material removal.
Applications: Suitable for general-purpose drilling in wood, metal, and plastic.
2.Brad Point Drill Bits:
Description: Designed with a sharp point and wide cutting edges, providing precise hole placement.
Applications: Ideal for woodworking, ensuring clean and accurate holes.
3.Auger Bits:
Description: Feature a spiral flute and a self-feeding design, making them ideal for drilling deep holes.
Applications: Commonly used in woodworking and construction for drilling deep holes.
4.Masonry Bits:
Description: Typically carbide-tipped to handle the hardness of concrete and masonry.
Applications: Used for drilling holes in concrete, brick, and stone.
5.Hole Saws:
Description: Cylinder-shaped bits with a cutting edge around the circumference, designed to cut larger holes.
Applications: Suitable for creating large holes in wood, metal, and plastic.

How to Use Drilling Bits
1.Select the Right Bit:
Choose the appropriate bit size and material for your project.
2.Insert the Bit:
Insert the drill bit into the chuck of your drill and secure it tightly.
3.Mark the Spot:
Use a pencil or a center punch to mark the exact spot where you want to drill the hole.
4.Drill the Hole:
Apply steady pressure and let the drill bit do the work. For metal, use a slow speed and apply cutting fluid to reduce friction and heat.
5.Clear the Hole:
Periodically remove the drill bit to clear out any accumulated material, especially when drilling deep holes.
what type of drill bit for concrete
When drilling into concrete, choosing the right type of drill bit is crucial for efficiency and effectiveness. Here are the main types of drill bits suitable for concrete:
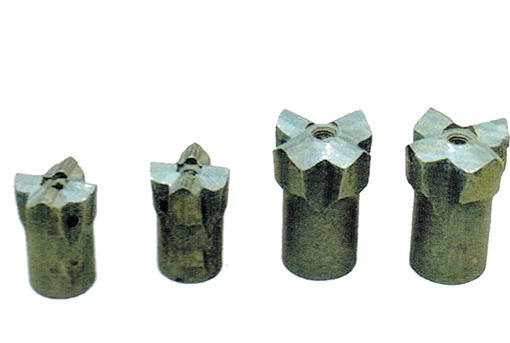
1. Masonry Bits
Description: These bits are designed specifically for drilling into concrete, brick, and stone. They have a carbide tip that can withstand the hardness of concrete.
Pros: Durable, precise, and suitable for small to medium-sized holes.
Cons: May not be as effective for very hard or reinforced concrete.
Usage: Ideal for general-purpose drilling in concrete and masonry.
2. Carbide-Tipped Bits
Description: These bits feature a carbide tip that provides superior durability and cutting power.
Pros: Handle tough concrete surfaces well and last longer than standard masonry bits.
Cons: More expensive than masonry bits.
Usage: Suitable for both small and large holes in concrete.
3. Diamond Core Bits
Description: These bits are embedded with diamond particles, making them extremely durable and effective for drilling large holes.
Pros: Excellent for precision drilling and can handle the hardest concrete surfaces.
Cons: More expensive and may require specialized equipment.
Usage: Ideal for creating larger openings in concrete, such as for plumbing or electrical installations.
4. Hammer Drill Bits
Description: Designed for use with hammer drills, these bits combine rotation with rapid hammering to break up the concrete.
Pros: Faster and more efficient drilling in tough concrete surfaces.
Cons: Require a hammer drill or rotary hammer for optimal performance.
Usage: Best used with hammer drills for heavy-duty concrete drilling.
Factors to Consider When Choosing a Concrete Drill Bit
Material Hardness: Softer concrete may only require a basic masonry bit, while harder or reinforced concrete may need carbide-tipped or diamond bits.
Bit Size: Choose the appropriate size based on the diameter of the hole needed. Common sizes range from 1/4 inch to over 1 inch.
Drill Compatibility: Ensure the bit is compatible with your drill. Hammer drills or rotary hammers are recommended for drilling into concrete.
Shank Type: Common shank types include straight shank, hex shank, and SDS shank. Ensure the shank type matches your drill.
how to know what size drill bit to use
Choosing the right size drill bit is crucial for achieving the desired results in your project. Here's a comprehensive guide to help you determine the appropriate drill bit size:
Step-by-Step Guide
1. Identify the Material
Wood: Generally, you can use a drill bit slightly smaller than the screw or fastener diameter.
Metal: Use a drill bit that matches the size of the screw or fastener, or slightly smaller for tapping threads.
Plastic: Similar to wood, use a bit slightly smaller than the fastener to prevent splitting.
2. Determine the Fastener Size
Screws and Bolts: Measure the diameter of the screw or bolt. For example, if you are using a 1/4-inch screw, you might use a #7 drill bit.
Taps: For tapping threads, use a drill bit that matches the tap size. For example, for a 1/4-20 tap, use a #7 drill bit.
3. Check the Project Requirements
Pilot Holes: For screws, drill a pilot hole that is slightly smaller than the screw to prevent splitting the material.
Clearance Holes: For bolts, drill a hole that matches the bolt diameter to ensure a snug fit.
Tapped Holes: Use a drill bit that matches the tap size to create threads.
4. Use a Drill Bit Size Chart
Charts: Many manufacturers provide drill bit size charts that match common screw and tap sizes. These charts are invaluable for selecting the right bit.
Common Drill Bit Sizes for Specific Applications
Wood Screws:
#6 Screw: Use a #33 or 1/8-inch drill bit.
#8 Screw: Use a #25 or 5/32-inch drill bit.
#10 Screw: Use a #1 or 3/16-inch drill bit.
Machine Screws:
1/4-20 Tap: Use a #7 drill bit.
5/16-18 Tap: Use a #3 drill bit.
3/8-16 Tap: Use a #1 drill bit.
Concrete Anchors:
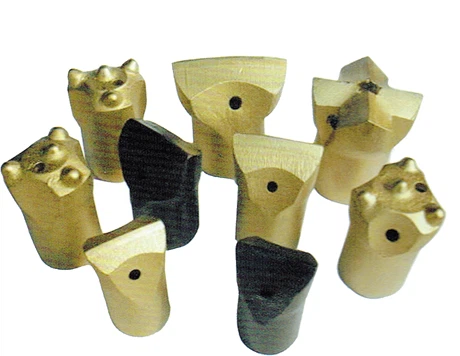
Plastic Expansion Anchors: Use a 3/16-inch or 1/4-inch drill bit.
Self-Drilling Anchors: Use a 5/32-inch drill bit.
Toggle Anchors: Use a 1/2-inch drill bit.
Tips for Choosing the Right Drill Bit Size
Test Fit: Always test the fit of the screw or bolt in the drilled hole. Adjust the bit size if necessary.
Material Considerations: Harder materials may require a slightly smaller bit to ensure the fastener fits snugly.
Safety First: Always wear safety glasses and gloves when operating power tools.
how to put in a drill bit
Inserting a drill bit into your drill is a straightforward process, but the exact steps depend on the type of chuck (the part that holds the drill bit) your drill has. Here's a detailed guide for inserting a drill bit into the three most common types of chucks: keyed, keyless, and quick-change.
For a Keyed Chuck:
1.Unplug the Drill:
Always unplug the drill or remove the battery to prevent accidental activation.
2.Locate the Chuck Key:
The chuck key is usually stored on the side of the drill or in a compartment on the drill case.
3.Loosen the Chuck:
Insert the key into one of the holes on the chuck.
Turn the key counterclockwise to loosen the chuck. You should feel the chuck getting looser as you turn the key.
4.Insert the Drill Bit:
Place the new drill bit into the chuck. Ensure it is centered and aligned properly.
5.Tighten the Chuck:
Use the chuck key again, but this time turn it clockwise to tighten the chuck around the new drill bit. Make sure it is snug and secure.
6.Test the Bit:
Plug in the drill or insert the battery, and give it a quick test to ensure the bit is spinning properly and not wobbling.
For a Keyless Chuck:
1.Unplug the Drill:
Always unplug the drill or remove the battery to prevent accidental activation.
2.Loosen the Chuck:
Grip the collar or sleeve on the chuck and turn it counterclockwise to loosen the chuck.
3.Insert the Drill Bit:
Place the new drill bit into the chuck, making sure it is centered.
4.Tighten the Chuck:
Twist the collar clockwise to tighten the chuck around the new drill bit. You may need to apply some force to get it tight enough.
5.Test the Bit:
Plug in the drill or insert the battery and give it a quick test to ensure the bit is secure and spinning smoothly.

For a Quick-Change Chuck:
1.Unplug the Drill:
Always unplug the drill or remove the battery to prevent accidental activation.
2.Press the Release Button:
Quick-change chucks usually have a button or lever that you press to release the bit.
3.Insert the Drill Bit:
Push the new bit into the holder until it clicks into place.
4.Test the Bit:
Plug in the drill or insert the battery and give it a quick test to ensure the bit is secure and spinning smoothly.
how to remove a stuck drill bit
Removing a stuck drill bit can be frustrating, but with the right techniques and tools, you can successfully extract it. Here's a comprehensive guide based on recent information:
Step-by-Step Guide
1. Assess the Situation
Determine why the drill bit is stuck and how deep it is lodged in the material. Understanding the issue will help you choose the appropriate tools and method for extraction.
2. Select the Right Tools
Pliers: A reliable pair of pliers is crucial for gripping the drill bit securely.
Drill Extractor Set: These sets include various extractor sizes to match different drill bit dimensions.
Lubricant: Penetrating oil or cutting fluid can help reduce friction and loosen the bit.
Safety Gear: Always wear protective gear such as goggles and gloves.
Heat Source: A heat gun or blow torch can be useful for expanding the material around the bit.
3. Prepare the Work Area
Secure the workpiece on a stable workbench or using clamps to prevent movement during extraction.
4. Apply Lubricant
Apply penetrating oil or lubricant to the area where the bit is stuck. Allow it to soak for a few minutes to reduce friction.
5. Use the Drill Extractor Set
Select the appropriate size extractor from your drill extractor set. Carefully attach it to your drill and slowly drill into the stuck bit in reverse.
6. Apply Heat (If Necessary)
If the bit is stuck due to overheating, use a heat gun or blow torch to gently heat the surrounding material. This can expand the material and loosen the bit.
7. Extract the Drill Bit
Once the bit is loosened, use the extractor to carefully remove it from the material. Apply steady pressure while turning the extractor counterclockwise.

Troubleshooting and Common Mistakes
Insufficient Lubrication: Lack of lubricant can increase friction, making it harder to remove the bit.
Incorrect Tool Selection: Using the wrong tools can damage the bit or worsen the situation.
Excessive Force: Applying too much force can damage the drill or workpiece.
Lack of Patience: Rushing the process can lead to mistakes. Take your time and work methodically.
how to use a step drill bit
Using a step drill bit is a straightforward process once you understand the basics. Here's a comprehensive guide to help you use step drill bits effectively and safely:
Preparation and Safety
1.Wear Protective Gear: Always wear safety glasses or goggles to protect your eyes from flying debris. Gloves are also recommended to protect your hands.
2.Secure the Material: Use clamps or a vise to hold the material firmly in place. This prevents the material from moving while drilling, ensuring accuracy and safety.
3.Mark the Spot: Use a marker or a center punch to mark the exact spot where you want to drill the hole. This helps guide the drill bit and ensures a precise hole.

Drilling Process
1.Insert the Bit: Securely insert the step drill bit into your drill. Ensure it is tightly fastened to prevent slipping.
2.Align the Drill: Position the drill bit perpendicular to the material's surface, with the tip directly over the marked spot.
3.Start Drilling: Begin drilling at a low speed to avoid overheating. Apply gentle, steady pressure and let the bit do the work. Avoid forcing the drill bit into the material, as this can cause it to bind or break.
4.Progress Gradually: As the bit penetrates the material, it will gradually increase the hole size with each step. Stop drilling once you reach the desired diameter.
5.Clear Debris: Periodically retract the bit to clear out any accumulated chips or shavings. This prevents clogging and ensures smooth drilling.
how to use left hand drill bit
Left-hand drill bits are designed to cut in the opposite direction of standard (right-hand) drill bits. They are particularly useful for drilling into materials where the standard bit would be difficult to use, such as when drilling into a blind hole or when using a hand brace. Here's a step-by-step guide on how to use a left-hand drill bit:
Step-by-Step Guide
1. Select the Right Drill Bit
Material: Choose a left-hand drill bit made from the appropriate material for your project. High-Speed Steel (HSS) bits are versatile and suitable for most materials, while carbide-tipped bits are ideal for harder materials like concrete.
Size: Select the correct size drill bit for the hole you need to create.
2. Prepare the Drill
Unplug the Drill: Always disconnect the drill from the power source before inserting or changing the drill bit.
Loosen the Chuck: For keyless chucks, hold the chuck collar and turn it counterclockwise to loosen the grip on the drill bit. For keyed chucks, insert the chuck key into the chuck and turn it counterclockwise.
3. Insert the Drill Bit
Align the Drill Bit: Hold the left-hand drill bit by its shank (the non-cutting end) and align it with the center hole of the chuck.
Insert the Bit: Gently push the drill bit into the chuck until it is fully seated. Ensure the bit is centered and straight.
4. Tighten the Chuck
Keyless Chuck: For keyless chucks, press the release button (usually located on the side of the drill) and twist the chuck clockwise to tighten it around the drill bit.
Keyed Chuck: For keyed chucks, insert the key into the chuck and turn it clockwise to tighten the chuck around the drill bit. Make sure the bit is secure but avoid overtightening.

5. Check the Bit
Ensure the Bit is Secure: Gently pull on the drill bit to ensure it is firmly in place.
Check for Alignment: Make sure the bit is straight and centered within the chuck to prevent wobbling during drilling.
6. Mark the Spot
Mark the Starting Point: Use a pencil or a small indentation to mark the spot where you want to create the hole.
7. Drill the Hole
Secure the Workpiece: Ensure the material being drilled is securely clamped or held in place to prevent movement.
Set Drill Speed: Adjust the drill speed to a moderate setting to prevent the material from cracking.
Apply Steady Pressure: Hold the drill steady and perpendicular to the surface. Apply steady pressure and let the drill bit do the work. For left-hand bits, you will need to rotate the drill counterclockwise.
8. Clear the Hole
Remove Debris: Periodically remove the bit from the hole to clear out any accumulated material. This helps maintain drilling efficiency and prevents overheating.


