

Using a drill bit correctly is essential for achieving accurate and efficient results in your projects. Here's a step-by-step guide on how to use a drill bit properly:
Preparation
1.Choose the Right Drill Bit:
Material: Select a drill bit suitable for the material you are drilling (e.g., wood, metal, plastic, masonry).
Size: Use the appropriate size drill bit for the hole you need. For example, if you're tapping a hole, use the correct pilot hole size.
Type: Choose between twist bits (for general use), masonry bits (for concrete), or specialty bits (like spade bits for wood).
2.Secure the Drill Bit:
Keyed Chuck: Insert the drill bit into the chuck, use the chuck key to tighten it securely.
Keyless Chuck: Insert the bit, twist the collar clockwise to tighten.
Quick-Change Chuck: Push the bit into the holder until it clicks into place.
3.Prepare the Workpiece:
Mark the Spot: Use a center punch or a pencil to mark the exact spot where you want to drill.
Secure the Material: Clamp the workpiece to a stable surface to prevent it from moving while drilling.
Drilling
1.Set the Drill:
Speed: Adjust the drill speed according to the material. Use a higher speed for wood and a lower speed for metal.
Mode: Ensure the drill is set to the correct mode (drilling or hammering for masonry).
2.Position the Drill:
Hold the drill with both hands, ensuring a firm grip.
Align the drill bit with the marked spot. Make sure the drill is perpendicular to the workpiece.
3.Start Drilling:
Initial Pressure: Apply gentle pressure to start the hole. Let the drill bit do the work.
Maintain Pressure: Keep steady pressure as the bit penetrates the material. Avoid pushing too hard, which can cause the bit to break or the drill to bind.
4.Clear Chips:
Wood: Periodically pull the drill bit out to clear wood chips.
Metal: Use cutting oil to lubricate the bit and clear metal shavings.
5.Drill to Depth:
Depth Control: If you need a specific depth, use a depth stop or mark the drill bit with tape.
Penetrate Completely: Continue drilling until you reach the desired depth. For through-holes, slow down as you break through to avoid damaging the material on the other side.

Finishing
1.Remove the Drill Bit:
Carefully pull the drill bit out of the hole. Be cautious of any remaining chips or debris.
2.Inspect the Hole:
Check the hole for accuracy and smoothness. If necessary, use a countersink or deburring tool to clean up the edges.
3.Clean Up:
Remove any dust or debris from the workpiece and your workspace.
what does a metal drill bit look like
A metal drill bit is a cutting tool designed specifically for drilling holes in metal. Here's a detailed description of what a metal drill bit looks like and its key features:
Key Features of a Metal Drill Bit
1.Shaft:
Appearance: The shaft is the long, cylindrical part of the drill bit that fits into the chuck of the drill. It is typically made of high-speed steel (HSS) or carbide, which gives it a shiny, metallic appearance.
Color: The shaft is usually silver or gray in color, depending on the material.
2.Flutes:
Appearance: Metal drill bits have flutes, which are the spiral grooves that run along the length of the bit. These flutes help to remove chips and debris from the hole as the bit drills into the material.
Number of Flutes: Most metal drill bits have two flutes, but some specialized bits may have more.
3.Point:
Appearance: The point is the tip of the drill bit, which is designed to penetrate the metal. It is usually sharp and may have a conical or chisel shape.
Angle: The point angle is typically 118 degrees for general-purpose drilling, but it can vary depending on the specific application.
4.Cutting Edges:
Appearance: The cutting edges are the sharp, beveled edges at the tip of the drill bit. These edges are responsible for cutting into the metal.
Condition: New drill bits have sharp, well-defined cutting edges, while worn bits may have dull or chipped edges.
** Shank**:
Appearance: The shank is the part of the drill bit that is gripped by the chuck. It is usually cylindrical and may have a slightly tapered end to fit snugly into the chuck.
Material: The shank is made of the same material as the rest of the bit, typically HSS or carbide.
Types of Metal Drill Bits
1.High-Speed Steel (HSS) Drill Bits:
Appearance: HSS bits are silver-gray in color and have a shiny, metallic finish.
Durability: They are suitable for general-purpose drilling in metals like steel, aluminum, and cast iron.
2.Carbide-Tipped Drill Bits:
Appearance: Carbide-tipped bits have a harder, darker gray color at the tip, which is the carbide material.
Durability: Carbide tips are more durable and can handle harder materials like stainless steel and titanium.
3.Cobalt Steel Drill Bits:
Appearance: Cobalt bits are similar in appearance to HSS bits but are more resistant to wear.
Durability: They are ideal for drilling harder metals and can maintain their cutting edges longer.

How to Identify a Metal Drill Bit
Labeling: Many drill bits have markings on the shank indicating the size, material, and type of bit.
Color and Finish: The metallic color and shiny finish are common indicators of metal drill bits.
Flutes and Point: The presence of flutes and a sharp point are key visual identifiers.
what drill bit for metal
When choosing a drill bit for metal, the type of metal and the specific task at hand are crucial factors. Here are some of the best drill bits for metal drilling based on the type of metal and application:
1. High-Speed Steel (HSS) Drill Bits
Characteristics: HSS bits are versatile and can handle a variety of materials, including soft metals like aluminum and mild steel. They are more durable than carbon steel bits and can withstand higher temperatures.
Best For: General-purpose drilling in softer metals.
Example: DeWalt Pilot Point Titanium Drill Bits, which are coated with titanium nitride for better performance in soft metals.
2. Cobalt Drill Bits
Characteristics: Cobalt bits are harder and more durable than HSS bits, making them ideal for drilling into harder metals like stainless steel and hardened steel. They come in different blends, such as M35 (5% cobalt) and M42 (8% cobalt).
M35 Cobalt: More flexible and less brittle, suitable for handheld drills.
M42 Cobalt: Harder and more effective for drilling very hard materials, but more brittle.
Best For: Drilling into hardened steel, stainless steel, and other tough metals.
Examples:
Drill America D/A Series M42 Cobalt Bits: Excellent for drilling hardened metals and stainless steel.
Milwaukee Red Helix Cobalt Drill Bits: Good for general steel drilling and more forgiving in handheld drills.
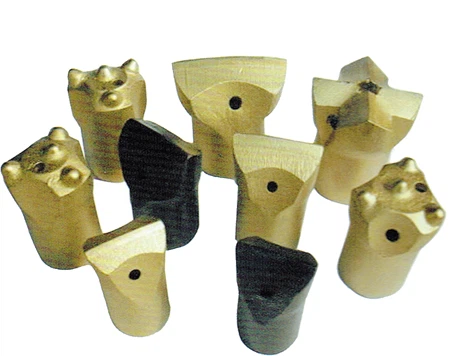
3. Titanium-Coated Drill Bits
Characteristics: Titanium nitride (TiN) or titanium carbonitride (TiCN) coatings improve durability and reduce friction, making these bits suitable for a wide range of metals. They are less brittle than cobalt bits but may wear out faster in very hard metals.
Best For: Drilling softer metals like aluminum and mild steel.
Example: DeWalt Pilot Point Titanium Drill Bits, which offer excellent performance in soft metals.
4. Specialty Drill Bits
Step Bits: Useful for drilling holes in thin metals like sheet metal. DeWalt Impact Ready Titanium Nitride Step Bits are a good choice.
Hole Saws: For larger holes in metal, carbide-tipped hole saws like Milwaukee's Hole Dozer Carbide Hole Saws are recommended.
what size drill bit 5/16 tap
To determine the correct drill bit size for a 5/16 tap, you need to consider the thread pitch of the tap. There are two common types of 5/16 taps:
1.5/16-18 UNC (Coarse Thread):
Drill Bit Size: Use an F drill bit, which has a diameter of approximately 0.257 inches.
2.5/16-24 UNF (Fine Thread):
Drill Bit Size: Use an I drill bit, which has a diameter of approximately 0.272 inches.
Why These Sizes?
Coarse Thread (5/16-18): The F drill bit size of 0.257 inches is ideal for creating a pilot hole that allows the tap to cut threads effectively without being too tight or too loose.
Fine Thread (5/16-24): The I drill bit size of 0.272 inches provides a slightly larger hole, which is necessary for the finer threads of the 5/16-24 tap.
how to take off a drill bit
For a 3/8-16 tap, the recommended drill bit size is 5/16 inch. This size ensures that the tap can create clean and accurate threads while leaving enough material for a strong connection.
how to replace a drill bit
Replacing a drill bit is a simple process, but the steps can vary slightly depending on the type of chuck (the part that holds the drill bit) your drill has. Here's a detailed guide on how to replace a drill bit for the three most common types of chucks: keyed, keyless, and quick-change.
1. For a Keyed Chuck
Keyed chucks are the most traditional type and require a chuck key to tighten or loosen the chuck.
Steps:
Unplug the Drill:
Safety First: Always unplug the drill or remove the battery before changing the bit to prevent accidental activation.
Locate the Chuck Key:
The chuck key is usually stored on the side of the drill or in a compartment on the drill case.
Loosen the Chuck:
Insert the key into one of the holes on the chuck.
Turn the key counterclockwise to loosen the chuck. You should feel the chuck getting looser as you turn the key.
Remove the Old Drill Bit:
Once the chuck is loose, you can pull out the old drill bit. It might be a bit tight, so you may need to wiggle it gently.
Insert the New Drill Bit:
Place the new drill bit into the chuck. Make sure it is centered and aligned properly.
Tighten the Chuck:
Use the chuck key again, but this time turn it clockwise to tighten the chuck around the new drill bit. Make sure it is snug and secure.
Test the Bit:
Plug in the drill or insert the battery, and give it a quick test to ensure the bit is spinning properly and not wobbling.
2. For a Keyless Chuck
Keyless chucks are more modern and can be tightened or loosened by hand.
Steps:
Unplug the Drill:
Always unplug the drill or remove the battery before changing the bit.
Loosen the Chuck:
Grip the collar or sleeve on the chuck and turn it counterclockwise to loosen the chuck.
Remove the Old Drill Bit:
Once the chuck is loose, pull out the old drill bit. It should come out easily.
Insert the New Drill Bit:
Place the new drill bit into the chuck, making sure it is centered.
Tighten the Chuck:
Twist the collar clockwise to tighten the chuck around the new drill bit. You may need to apply some force to get it tight enough.
Test the Bit:
Plug in the drill or insert the battery and give it a quick test to ensure the bit is secure and spinning smoothly.

3. For a Quick-Change Chuck
Quick-change chucks (also known as screwdriver bit holders) are designed for rapid bit changes, typically used in cordless drills or impact drivers.
Steps:
Unplug the Drill:
Always unplug the drill or remove the battery before changing the bit.
Press the Release Button:
Quick-change chucks usually have a button or lever that you press to release the bit.
Remove the Old Bit:
Pull out the old bit. It should come out easily once the release button is pressed.
Insert the New Bit:
Push the new bit into the holder until it clicks into place.
Test the Bit:
Plug in the drill or insert the battery and give it a quick test to ensure the bit is secure and spinning smoothly.
how to insert a drill bit into a drill
Inserting a drill bit into a drill is a straightforward process, but it's important to do it correctly to ensure the bit is secure and the drill operates efficiently. Here's a step-by-step guide:
Step-by-Step Guide
1. Ensure Safety
Unplug the Drill: Always disconnect the drill from the power source before inserting or changing the drill bit. This ensures your safety and prevents any accidental startups.
2. Loosen the Chuck
Keyless Chuck: For drills with a keyless chuck, hold the chuck collar and turn it counterclockwise to loosen the grip on the drill bit.
Keyed Chuck: For drills with a keyed chuck, insert the chuck key into the chuck and turn it counterclockwise to loosen the chuck.
3. Insert the Drill Bit
Align the Drill Bit: Hold the drill bit by its shank (the non-cutting end) and align it with the center hole of the chuck.
Insert the Bit: Gently push the drill bit into the chuck until it is fully seated. Ensure the bit is centered and straight.

4. Tighten the Chuck
Keyless Chuck: For keyless chucks, press the release button (usually located on the side of the drill) and twist the chuck clockwise to tighten it around the drill bit.
Keyed Chuck: For keyed chucks, insert the key into the chuck and turn it clockwise to tighten the chuck around the drill bit. Make sure the bit is secure but avoid overtightening.
5. Check the Bit
Ensure the Bit is Secure: Gently pull on the drill bit to ensure it is firmly in place.
Check for Alignment: Make sure the bit is straight and centered within the chuck to prevent wobbling during drilling.
6. Test the Drill
Plug in the Drill: Once the bit is securely in place, plug in the drill or insert the battery.
Test the Drill: Turn on the drill and let it run for a few seconds to ensure the bit is spinning smoothly and straight.
how to take off a drill bit
Taking off a drill bit is a simple process, but the exact steps depend on the type of chuck (the part that holds the drill bit) your drill has. Here's how to remove a drill bit from the three most common types of chucks: keyed, keyless, and quick-change.
For a Keyed Chuck:
1.Unplug the Drill:
Always unplug the drill or remove the battery to prevent accidental activation.
2.Locate the Chuck Key:
The chuck key is usually stored on the side of the drill or in a compartment on the drill case.
3.Loosen the Chuck:
Insert the key into one of the holes on the chuck.
Turn the key counterclockwise to loosen the chuck. You should feel the chuck getting looser as you turn the key.
4.Remove the Drill Bit:
Once the chuck is loose, pull out the drill bit. It might be a bit tight, so you may need to wiggle it gently.
For a Keyless Chuck:
1.Unplug the Drill:
Always unplug the drill or remove the battery to prevent accidental activation.
2.Loosen the Chuck:
Grip the collar or sleeve on the chuck and turn it counterclockwise to loosen the chuck.
3.Remove the Drill Bit:
Once the chuck is loose, pull out the drill bit. It should come out easily.

For a Quick-Change Chuck:
1.Unplug the Drill:
Always unplug the drill or remove the battery to prevent accidental activation.
2.Press the Release Button:
Quick-change chucks usually have a button or lever that you press to release the bit.
3.Remove the Drill Bit:
Pull out the old bit. It should come out easily once the release button is pressed.
what drill bit can drill asphalt driveway
To drill into an asphalt driveway, you need a drill bit that can handle the hardness and abrasiveness of asphalt. Here are the recommended types of drill bits and tips for drilling asphalt driveways:
Recommended Drill Bits for Asphalt Driveways
1.Carbide-Tipped Masonry Bits:
Description: These bits are designed specifically for drilling into hard materials like asphalt and concrete. They feature tungsten carbide tips that provide exceptional durability and cutting ability.
Advantages: Durable, versatile, and suitable for general-purpose drilling in asphalt.
2.Diamond-Tipped Core Bits:
Description: Diamond core bits are ideal for cutting through very hard or highly compacted asphalt. They are also useful for creating larger holes.
Advantages: Superior cutting performance, longevity, and precision.
3.Hammer Drill Bits:
Description: Hammer drill bits are designed for use with a hammer drill, which provides a percussive action that helps break through asphalt more efficiently.
Advantages: Faster drilling, especially for shallow holes and patchwork jobs.

Tips for Drilling into Asphalt Driveways
1.Choose the Right Drill:
Use a powerful hammer drill with a hammer function to make the process more efficient.
2.Safety Equipment:
Wear safety glasses, ear protection, work gloves, and a dust mask to protect yourself from debris and dust.
3.Cooling and Lubrication:
Use water to cool the drill bit and reduce friction. This helps prevent overheating and extends the life of the bit.
4.Drilling Technique:
Start with a pilot hole to guide the bit. Maintain a 90-degree angle to the surface and apply steady pressure.
For best results, drill at 900 RPM and take 5-minute cooling intervals every 15 minutes of drilling.
Surface Preparation:
Mark the drilling spots accurately with chalk or a marking pencil. Clear any loose debris from the area.
Drill Bit Maintenance:
Clean the bit after each use to remove debris. Inspect the cutting edges regularly and replace the bit if it shows signs of wear.
what is an auger square drill bit used for
An auger square drill bit, also known as a square shank drill bit, is a specialized tool designed for specific applications. Here's a detailed explanation of its uses and characteristics:
Key Features and Uses
1.Square Shank:
Design: The square shank is designed to fit into the chuck of a drill or a power tool, providing a secure and stable grip.
Function: The square shape prevents the bit from slipping or rotating inside the chuck, ensuring precise and consistent drilling.
2.Auger Design:
Fluted Shaft: Auger bits have a fluted shaft that helps remove material as the bit drills into the workpiece. This design is particularly useful for drilling deep holes.
Self-Feeding: The auger design allows the bit to self-feed into the material, reducing the need for manual pressure.
Applications
1.Woodworking:
Drilling Holes: Auger bits are commonly used for drilling holes in wood. The fluted design helps remove wood chips efficiently, making it easier to drill deep, straight holes.
Wooden Construction: Ideal for applications like furniture making, cabinetry, and general woodworking projects.
2.Construction:
Concrete and Masonry: Some auger bits are designed for drilling into concrete and masonry. These bits are typically made from carbide or other durable materials to withstand the hardness of these materials.
Pilot Holes: Used for creating pilot holes for screws or bolts in various construction materials.
3.Metalworking:
Metal Drilling: Auger bits can also be used for drilling holes in metals like steel and aluminum. The self-feeding design helps in achieving clean and precise holes.
Thread Tapping: In some cases, auger bits can be used to create pilot holes for tapping threads in metal.
Advantages
Efficiency: The auger design removes material efficiently, making it easier to drill deep holes.
Precision: The square shank provides a secure grip, ensuring precise and consistent drilling.
Versatility: Auger bits can be used for a variety of materials, including wood, metal, and masonry.
How to Use an Auger Square Drill Bit
Select the Right Bit:
Choose the appropriate auger bit size and material based on your project needs.
Secure the Bit:
Insert the square shank of the bit into the chuck of your drill or power tool. Ensure the bit is securely tightened to prevent slipping.
Drill the Hole:
Apply steady pressure and let the auger bit self-feed into the material. Avoid applying excessive force, as this can cause the bit to bind or break.
Clear the Hole:
Periodically remove the bit from the hole to clear out any accumulated material. This helps maintain drilling efficiency and prevents overheating.
what size drill bit for 10 screw
For a #10 screw, the recommended drill bit size typically ranges between 3/16 inch (0.1875 inches) and 5/32 inch (0.15625 inches), depending on the specific application and material. Here are some key points to consider:
1.Wood or Plastic:
For a #10 wood screw, a 5/32-inch drill bit is commonly used to create a pilot hole. This size helps prevent the wood from splitting while allowing the screw to fit snugly.
If you are using a countersink bit to create a flush finish, ensure the pilot hole is drilled first with the appropriate size.
2.Metal:
When drilling into metal, a slightly smaller pilot hole is often preferred to ensure the screw threads grip the material properly. A 5/32-inch drill bit is typically suitable for a #10 metal screw.
For thicker metals, you may need to adjust the drill bit size slightly larger to accommodate the screw without compromising the metal's integrity.
3.General Tips:
Always match the drill bit size to the screw size to avoid loose connections or difficulty in securing the screw.
Consider the material type and thickness when selecting the drill bit size.
Use lubrication when drilling into metal to reduce friction and heat.
is titanium good for drill bits
Titanium drill bits have both advantages and limitations, and whether they are "good" depends on the specific application and material you are working with. Here's a detailed overview based on recent research and expert opinions:
Advantages of Titanium Drill Bits
1.Heat Resistance:
Titanium drill bits, especially those coated with titanium nitride (TiN), titanium carbonitride (TiCN), or titanium aluminum nitride (TiAlN), have excellent heat resistance. This allows them to stay cooler during drilling, reducing the risk of overheating and extending their lifespan.
2.Durability and Wear Resistance:
The titanium coating significantly increases the hardness and wear resistance of the drill bits compared to standard high-speed steel (HSS) bits. This means they maintain their sharpness longer and produce cleaner, more precise holes.
3.Versatility:
Titanium-coated drill bits are suitable for a wide range of materials, including wood, plastic, aluminum, brass, and even mild steel. They are particularly effective for drilling through softer metals and creating splinter-free holes in wood.
4.Cost-Effective in the Long Run:
Although titanium drill bits are more expensive upfront, their durability means they need to be replaced less frequently. This can save time and money in the long term, especially for professionals who use them regularly.
When Titanium Drill Bits Are Not the Best Choice
1.Hardened Metals:
Titanium drill bits are not ideal for drilling through hardened steel, stainless steel, or cast iron. These materials require more durable bits, such as cobalt or carbide, which can withstand higher levels of hardness and abrasiveness.
2.Difficulty in Sharpening:
Titanium-coated drill bits cannot be easily sharpened without removing the coating. Once the coating is worn off, the bit essentially becomes a standard HSS bit.
3.Limited Longevity in Extreme Conditions:
While titanium bits offer good heat resistance, they may still wear out faster than cobalt or carbide bits when used continuously in high-heat or highly abrasive conditions.

Comparison with Other Materials
Cobalt Drill Bits:
Cobalt bits are harder and more durable, making them better suited for drilling through hardened metals. However, they are more expensive and may be overkill for softer materials.
Carbide Drill Bits:
Carbide bits are the most durable and heat-resistant but are also the most expensive. They are ideal for drilling through extremely hard materials like stainless steel or cast iron.


