


Drill bits are essential tools used in various industries, and their manufacturing process is a meticulous and multi-step procedure that ensures high quality and durability. Here's an overview of how drill bits are made:
1. Material Selection
The first step in manufacturing a drill bit is selecting the right material. Common materials include high-speed steel (HSS) and carbide (tungsten steel). The choice of material depends on the intended application and specific requirements of the drill bit.
2. Forging or Forming
The selected material is then forged or formed into the basic shape of the drill bit. Forging is typically used for high-performance drill bits, offering enhanced strength and durability. Alternatively, standard drill bits might be produced using simpler forming techniques.
3. Heat Treatment
Heat treatment is a crucial process that enhances the hardness and wear resistance of the drill bit. Common methods include quenching and tempering, which help achieve the desired balance of hardness and toughness. This step is essential for ensuring the drill bit can endure high-stress conditions without compromising its structural integrity.
4. Rough Machining
In the rough machining phase, lathes, milling machines, and other mechanical equipment are used to shape the drill bit to its initial geometric specifications. This stage involves cutting, turning, and grinding operations to create the preliminary form of the drill bit.
5. Precision Machining
Precision machining follows, where the drill bit undergoes finer processing to achieve exact dimensional accuracy and surface finish. This stage includes grinding and polishing operations to meet the stringent design specifications and ensure a high-quality surface finish.

6. Cutting Edge Formation
The cutting edges of the drill bit are meticulously ground to create sharp and effective cutting edges. The angles and shapes of these edges are critical for the performance of the drill bit. Specialized equipment is used to ensure precise and consistent edge formation.
7. Coating Treatment
To further enhance durability and performance, drill bits may undergo surface coating treatments, such as titanium or titanium nitride coating. These coatings significantly improve wear resistance and heat tolerance, extending the lifespan of the drill bit.
8. Inspection and Quality Control
Rigorous quality control measures are implemented to ensure each drill bit meets the required standards. This includes dimensional inspection, hardness testing, and surface quality assessment. Only those drill bits that pass these stringent tests are approved for packaging and distribution.
9. Packaging and Distribution
Approved drill bits are carefully packaged and labeled, ready for shipment to customers. Clear identification and proper packaging ensure the drill bits are protected during transit and easily identifiable for end-users.
do all drill bits fit
No, not all drill bits fit all drills. Drill bits are designed to fit specific types of drill chucks, and the compatibility depends on the shank (the part of the bit that fits into the drill) and the type of chuck on your drill. Here's a breakdown of the common types of drill bit shanks and chucks, and how they fit together:
Types of Drill Bit Shanks
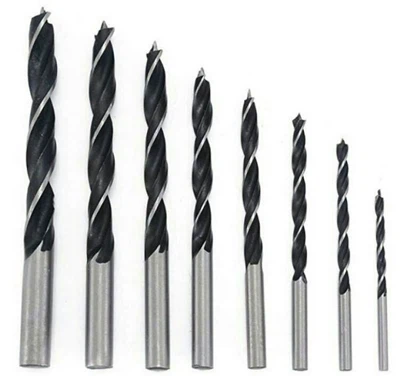
1.Straight Shank:
Description: The most common type, typically cylindrical in shape.
Materials: Used in high-speed steel (HSS) and carbide-tipped bits.
Compatibility: Fits standard keyless or keyed chucks found on most power drills.
2.Tapered Shank:
Description: Designed with a tapered shape that becomes wider toward the cutting end.
Materials: Common in auger bits and some heavy-duty bits.
Compatibility: Requires a specific tapered chuck, often found on bench drills or some heavy-duty power drills.
3.Hex Shank:
Description: Has a hexagonal shape, usually 1/4" or 3/8" in size.
Materials: Common in impact drivers and some power drills.
Compatibility: Fits drills with a hex chuck or quick-change chucks.
4.SDS Shank:
Description: Features a slotted drive system with a unique shank design.
Materials: Used in SDS hammer drills.
Compatibility: Only fits SDS chucks found on SDS hammer drills.
Types of Drill Chucks
1.Keyless Chucks:
Description: Can be tightened or loosened by hand.
Compatibility: Fits most straight shank drill bits. Suitable for general-purpose drills.
2.Keyed Chucks:
Description: Requires a chuck key to tighten or loosen the bit.
Compatibility: Fits most straight shank drill bits. Common on older drills or heavy-duty bench drills.
3.Hex Chucks:
Description: Designed to hold hex shank bits.
Compatibility: Fits hex shank bits, commonly used in impact drivers and some power drills.
4.SDS Chucks:
Description: Designed for SDS shank bits.
Compatibility: Only fits SDS shank bits, used in SDS hammer drills.
How to Ensure Compatibility
Check the Drill Manual: Always refer to the user manual for your drill to determine the type of chuck and compatible bit shanks.
Inspect the Drill Chuck: Look at the chuck on your drill. Keyless chucks are the most common and can handle most straight shank bits.
Match the Shank to the Chuck: Ensure the shank of the bit matches the type of chuck on your drill. For example, a hex shank bit will not fit a keyless chuck unless you use an adapter.
Adapters
If you have a drill bit with a different shank type than your drill chuck, you can use an adapter to make it fit. For example:
Hex-to-Keyless Adapter: Allows hex shank bits to fit into a keyless chuck.
SDS-to-Keyless Adapter: Allows SDS shank bits to fit into a keyless chuck.
how do you measure a drill bit
Measuring a drill bit accurately is essential for selecting the right size for your drilling needs. Drill bits are typically measured by their diameter, which is the critical dimension for ensuring a proper fit and function. Here's a step-by-step guide on how to measure a drill bit:
Tools Needed
Calipers: Digital or dial calipers are the most accurate tools for measuring drill bits.
Ruler or Tape Measure: For less precise measurements.
Drill Bit Gauge: A specialized tool with holes of various sizes for quick measurement.
Steps to Measure a Drill Bit
1. Identify the Part to Measure
The diameter of a drill bit is measured at the cutting end (the tip). This is the part that creates the hole in the material.
2. Using Calipers
Calipers are the most precise tool for measuring drill bits. Here's how to use them:
Open the Calipers: Ensure the calipers are fully open.
Place the Bit: Insert the drill bit between the jaws of the calipers. Make sure the bit is perpendicular to the jaws.
Close the Jaws: Gently close the jaws until they make contact with the bit.
Read the Measurement: Look at the display on the calipers to read the diameter. Digital calipers will show the measurement directly, while dial calipers require reading the scale.
3. Using a Ruler or Tape Measure
For a less precise measurement, you can use a ruler or tape measure:
Place the Bit: Lay the drill bit flat on a surface.
Measure the Diameter: Use the ruler or tape measure to measure the distance across the widest part of the cutting end (the tip). This is the diameter.
Note the Measurement: Record the measurement in inches or millimeters.
4. Using a Drill Bit Gauge
A drill bit gauge is a quick and easy tool for measuring drill bits:
Insert the Bit: Place the drill bit into the holes of the gauge until it fits snugly.
Identify the Size: The size of the hole that fits the bit is the diameter of the drill bit.
Common Drill Bit Sizes
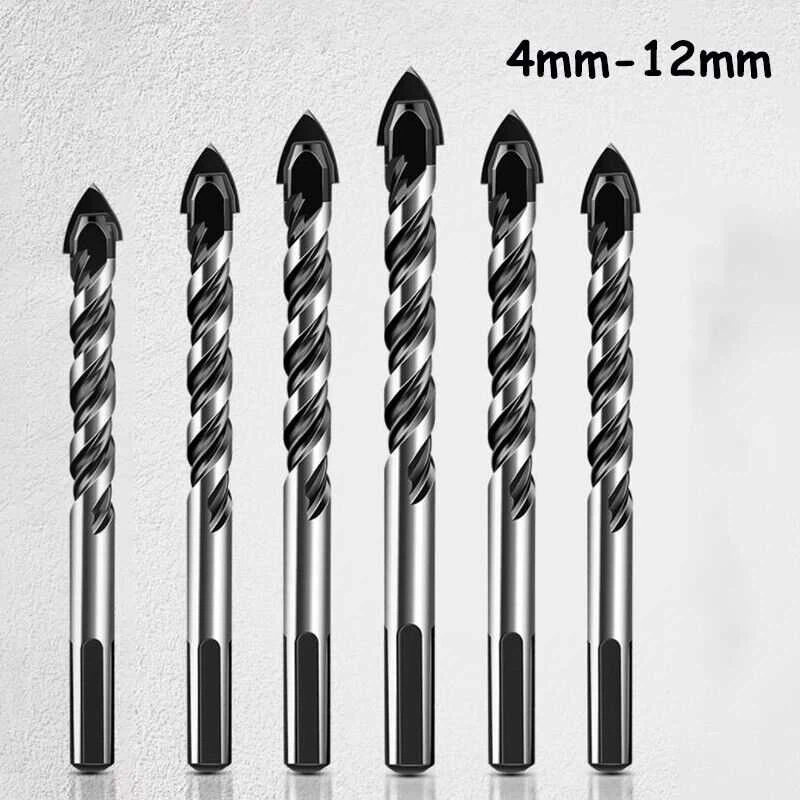
Drill bits come in various size systems, including:
Fractional Inches: (e.g., 1/16", 1/8", 3/16", 1/4")
Decimal Inches: (e.g., 0.125", 0.250")
Wire Gauge Numbers: (e.g., #1, #2, #21)
Metric Sizes: (e.g., 1.0 mm, 2.0 mm, 3.0 mm)
how to attach a drill bit
Attaching a drill bit to your drill is a straightforward process, but the exact steps depend on the type of chuck (the part that holds the drill bit) your drill has. Here's a detailed guide for attaching a drill bit to the three most common types of chucks: keyed, keyless, and quick-change.
For a Keyed Chuck:
1.Unplug the Drill:
Always unplug the drill or remove the battery to prevent accidental activation.
2.Locate the Chuck Key:
The chuck key is usually stored on the side of the drill or in a compartment on the drill case.
3.Loosen the Chuck:
Insert the key into one of the holes on the chuck.
Turn the key counterclockwise to loosen the chuck. You should feel the chuck getting looser as you turn the key.
4.Insert the Drill Bit:
Place the new drill bit into the chuck. Ensure it is centered and aligned properly.
5.Tighten the Chuck:
Use the chuck key again, but this time turn it clockwise to tighten the chuck around the new drill bit. Make sure it is snug and secure.
6.Test the Bit:
Plug in the drill or insert the battery, and give it a quick test to ensure the bit is spinning properly and not wobbling.
For a Keyless Chuck:
1.Unplug the Drill:
Always unplug the drill or remove the battery to prevent accidental activation.
2.Loosen the Chuck:
Grip the collar or sleeve on the chuck and turn it counterclockwise to loosen the chuck.
3.Insert the Drill Bit:
Place the new drill bit into the chuck, making sure it is centered.
4.Tighten the Chuck:
Twist the collar clockwise to tighten the chuck around the new drill bit. You may need to apply some force to get it tight enough.
5.Test the Bit:
Plug in the drill or insert the battery and give it a quick test to ensure the bit is secure and spinning smoothly.
For a Quick-Change Chuck:
1.Unplug the Drill:
Always unplug the drill or remove the battery to prevent accidental activation.
2.Press the Release Button:
Quick-change chucks usually have a button or lever that you press to release the bit.
3.Insert the Drill Bit:
Push the new bit into the holder until it clicks into place.
4.Test the Bit:
Plug in the drill or insert the battery and give it a quick test to ensure the bit is secure and spinning smoothly.
how to extend a drill bit
Extending a drill bit can be necessary for reaching deep or hard-to-access areas. Here are several methods to extend a drill bit effectively:
1. Using a Drill Bit Extension
Drill bit extensions are specifically designed to add length to your drill bit. They are available in various lengths and are typically made of sturdy metal.
Steps:
Select the Right Extension: Choose an extension that matches the diameter of your drill bit.
Insert the Bit: Place the drill bit into the bottom end of the extension. Ensure the shank of the bit is fully inserted.
Secure the Bit: Tighten the set screw or use a retaining spring to secure the drill bit within the extension.
Attach to the Drill: Insert the other end of the extension into the drill chuck and tighten securely.
Pros: Easy to use, compatible with most drills, and durable.
Cons: May not provide enough length for very deep holes.
2. Using a Drill Bit Adapter
Drill bit adapters are similar to extensions but offer more versatility and functionality.
Steps:
Choose the Right Adapter: Ensure the adapter matches the diameter of your drill bit and the chuck of your drill.
Insert the Bit: Place the drill bit into the adapter's bottom end, ensuring it is fully seated.
Secure the Bit: Tighten the set screw or use a retaining mechanism to hold the bit in place.
Attach to the Drill: Insert the adapter into the drill chuck and secure it tightly.
Pros: Can be combined for greater length and flexibility.
Cons: Multiple adapters may reduce overall stability.
3. Using an Extension Rod
Extension rods are ideal for applications requiring significant length, such as deep-hole drilling.
Steps:
Select the Right Rod: Choose a sturdy extension rod made of materials like stainless steel or fiberglass.
Connect the Rod: Attach one end of the rod to the drill bit and the other end to the drill chuck.
Secure the Connection: Ensure both connections are tight and secure.
Pros: Provides extreme length for deep drilling.
Cons: May not be readily available in all hardware stores and can be expensive.
4. DIY Drill Bit Extension
If commercial extensions don't meet your needs, you can create a custom extension.
Materials: A sturdy metal rod, a nut, and a washer.
Steps:
Drill a Hole: Drill a hole through the metal rod that matches the diameter of the drill bit.
Secure the Bit: Insert the drill bit through the hole and use a nut and washer to secure it in place.
Pros: Cost-effective and customizable.
Cons: The strength depends on the quality of the materials used, and safety is crucial to ensure a secure connection.
5. Using a Drill Press
For very deep holes, a drill press can provide better stability and control than a handheld drill.
Steps:
Install the Bit: Mount the drill bit into the spindle of the drill press.
Adjust Depth and Speed: Set the depth and speed of the drill press for accurate drilling.
Pros: The sturdy frame and precise adjustments of a drill press can reduce vibration and ensure accurate drilling.
Cons: A drill press is a stationary tool and is not suitable for use in confined spaces.
6. Rod and Coupling Technique
This method uses long metal rods connected with couplings to extend the drill bit.
Steps:
Select the Rod and Couplings: Choose a metal rod and couplings that match the diameter of your drill bit.
Connect the Rod: Use the couplings to connect the rod to the drill bit and the drill chuck.
Pros: Metal rods provide high strength and durability, making them suitable for deep-hole drilling.
Cons: Proper alignment of the rod and couplings is essential to avoid drilling errors.
how to get a stuck drill bit out
Removing a stuck drill bit can be a frustrating task, but with the right tools and techniques, you can successfully extract it. Here are some effective methods and steps to help you get a stuck drill bit out:
1. Using Pliers
If the drill bit is protruding from the chuck, you can try using pliers to grip and twist it out:
Secure the Drill: Place the drill in a vice or clamp to hold it steady.
Grip the Bit: Use a pair of pliers or locking pliers to firmly grip the protruding part of the drill bit.
Twist Counterclockwise: Gently twist the bit counterclockwise to loosen it. Apply steady pressure but avoid forcing it to prevent damage.
2. Using a Drill Bit Extractor
A drill bit extractor is a specialized tool designed to remove stuck bits:
Select the Right Size: Choose an extractor that fits the size of your stuck drill bit.
Insert the Extractor: Insert the extractor into the hole and rotate it clockwise to engage the bit.
Twist Counterclockwise: Once engaged, twist the extractor counterclockwise to remove the bit.
3. Applying Lubricant
Lubricants can help reduce friction and make the removal process easier:
Apply Penetrating Oil: Use a penetrating oil like WD-40 around the bit and let it sit for 10-15 minutes to penetrate any rust or debris.
Tap Gently: After applying the lubricant, gently tap the chuck with a rubber mallet to help break any binding.
4. Using Heat or Cold
Heat or cold can sometimes help in loosening a stuck bit:
Heat Application: Use a heat gun to apply heat to the chuck. The heat can cause the metal to expand, making it easier to remove the bit.
Freezer Method: Place the chuck in the freezer for about 30 minutes. The cold can cause the metal to contract, making it easier to release the bit.
5. Drilling Out the Bit
If other methods fail, you may need to drill out the bit:
Use a Larger Bit: Select a drill bit that is slightly larger than the stuck bit and carefully drill it out.
Be Cautious: Proceed slowly to avoid damaging the surrounding material.

Safety Precautions
Wear Protective Gear: Always wear safety goggles and gloves to protect yourself from flying debris.
Secure the Workpiece: Ensure the workpiece is firmly clamped to prevent movement.
Work in a Well-Ventilated Area: This helps avoid inhaling any dust or fumes generated during the extraction process.
When to Seek Professional Help
If all else fails, it's best to seek professional help. A qualified mechanic or engineer can use specialized tools and techniques to remove the stuck drill bit safely and effectively.
how to get broken drill bit out of hole
Removing a broken drill bit from a hole can be challenging, but with the right tools and techniques, it is possible. Here are several methods you can use to extract a broken drill bit:
Method 1: Using a Left-Hand Drill Bit
This method is effective if the broken bit is protruding slightly from the hole.
Secure the Workpiece: Clamp or secure the workpiece firmly to prevent movement.
Select the Right Bit: Choose a left-hand drill bit that is slightly smaller in diameter than the broken bit.
Align the Drill: Insert the left-hand drill bit into the drill and align it with the broken bit.
Apply Gentle Pressure: Apply light pressure and start drilling slowly. The left-hand drill bit will engage the broken bit and start to loosen it.
Reverse Direction: If the bit doesn't come out, try reversing the direction of the drill.
Patience is Key: Be patient and persistent. It may take several attempts to loosen the bit.
Method 2: Using a Reverse Drill Bit
Reverse drill bits are designed specifically for removing broken bits.
Select the Right Bit: Choose a reverse drill bit that fits snugly inside the broken bit.
Secure the Workpiece: Clamp or secure the workpiece to prevent movement.
Insert the Bit: Carefully insert the reverse drill bit into the hole, aligning it with the broken bit.
Apply Gentle Pressure: Apply light pressure and rotate the reverse drill bit clockwise. The reverse thread will engage the broken bit and start to extract it.
Gradually Increase Pressure: As the bit starts to loosen, gradually increase the pressure.
Continue Rotating: Keep rotating the drill bit until the broken bit is completely removed.
Method 3: Using a Drill Bit Extractor
Specialized extractors are available for removing broken drill bits.
Choose the Right Tool: Select an extractor that is compatible with the type of broken bit you have.
Secure the Workpiece: Clamp or secure the workpiece to prevent movement.
Insert the Tool: Carefully insert the extractor into the hole, aligning it with the broken bit.
Apply Pressure: Apply pressure to the tool, rotating it clockwise to engage the broken bit.
Gradually Increase Pressure: As the bit starts to loosen, gradually increase the pressure.
Continue Rotating: Keep rotating the tool until the broken bit is completely removed.
Method 4: Drilling Around the Broken Bit
If the broken bit is deeply embedded and cannot be grasped directly, drilling around it may be necessary.
Use a Smaller Bit: Use a smaller drill bit to create holes around the perimeter of the broken piece, effectively loosening its grip on the surrounding material.
Be Cautious: Be careful not to compromise the integrity of your workpiece.
Extract the Bit: Once the broken bit is loosened, use pliers or a magnet to extract it.
Method 5: Tapping the Bit Out with a Punch
If the broken bit is stuck tightly but visible, a punch and hammer can help dislodge it.
Position the Punch: Place the pointed end of the punch at an angle against the broken bit.
Tap Gently: Tap the punch gently with a hammer. The goal is to rotate the bit counterclockwise and loosen it enough for removal.
Controlled Taps: Use controlled taps to avoid damaging the surrounding metal.
Method 6: Using a Magnet
If the broken drill bit is made of ferrous material (e.g., steel) and has some freedom of movement, a strong magnet can help extract it.
Hold the Magnet Close: Hold the magnet close to the broken piece and gently move it to draw the bit out.
Gently Move: This method works best when the bit is not tightly lodged and can be pulled with minimal force.
Method 7: Using a Welding Technique
For metalworking enthusiasts with access to welding equipment, this method can be particularly effective for stubborn bits broken flush or below the surface.
Clean the Surface: Clean the surface area around the broken bit thoroughly.
Weld a Rod: Take a metal rod or bolt that's larger in diameter than the broken bit and weld it perpendicular to the top of the broken bit.
Cool and Extract: Allow the weld to cool completely, then use the rod as a lever, turning counterclockwise to extract the broken bit.
Method 8: Drilling Out the Broken Bit
If other methods fail, you may need to drill out the broken bit.
Select the Right Bit: Use a carbide drill bit slightly smaller than the broken bit.
Center-Punch: Create a starting point for your drill by center-punching the broken bit.
Drill Slowly: Drill very slowly with firm pressure, using cutting oil to keep the bit cool.
Extract Fragments: Once you've drilled through most of the broken bit, the remaining fragments can usually be picked out.
Method 9: The Punch-Out Method
For through-holes, you may be able to punch out the broken bit from the opposite side.
Position the Punch: Find a punch that fits loosely in the hole and position it against the broken bit from the opposite side.
Tap Firmly: Tap the punch firmly but carefully with a hammer.
Increase Force: Continue tapping with gradually increasing force until the bit begins to move.
Method 10: Creating a Slot for Screwdriver Extraction
If the broken bit is flush with the surface, you might be able to create a slot for extraction.
Cut a Slot: Use a Dremel tool with a cutting wheel to cut a slot across the exposed end of the broken bit.
Insert Screwdriver: Insert a screwdriver into the slot and apply downward pressure while turning counterclockwise to extract the bit.

Tips for Successful Removal
Select the Appropriate Method: Choose the removal technique that best fits the depth and position of the broken bit.
Use the Right Tools: Ensure you have high-quality pliers, drill bit extractors, and punches.
Ensure Safety Precautions: Always wear protective eyewear and gloves.
Lubricate When Necessary: Applying a penetrating oil or lubricant can reduce friction.
Apply Consistent Pressure: Use even and consistent pressure to avoid further complications.
Be Patient: Take your time to perform each step carefully.
how to get a stuck drill bit out
Removing a stuck drill bit can be a frustrating task, but with the right tools and techniques, you can successfully extract it. Here are some effective methods and steps to help you get a stuck drill bit out:
1. Using Pliers
If the drill bit is protruding from the chuck, you can try using pliers to grip and twist it out:
Secure the Drill: Place the drill in a vice or clamp to hold it steady.
Grip the Bit: Use a pair of pliers or locking pliers to firmly grip the protruding part of the drill bit.
Twist Counterclockwise: Gently twist the bit counterclockwise to loosen it. Apply steady pressure but avoid forcing it to prevent damage.
2. Using a Drill Bit Extractor
A drill bit extractor is a specialized tool designed to remove stuck bits:
Select the Right Size: Choose an extractor that fits the size of your stuck drill bit.
Insert the Extractor: Insert the extractor into the hole and rotate it clockwise to engage the bit.
Twist Counterclockwise: Once engaged, twist the extractor counterclockwise to remove the bit.
3. Applying Lubricant
Lubricants can help reduce friction and make the removal process easier:
Apply Penetrating Oil: Use a penetrating oil like WD-40 around the bit and let it sit for 10-15 minutes to penetrate any rust or debris.
Tap Gently: After applying the lubricant, gently tap the chuck with a rubber mallet to help break any binding.
4. Using Heat or Cold
Heat or cold can sometimes help in loosening a stuck bit:
Heat Application: Use a heat gun to apply heat to the chuck. The heat can cause the metal to expand, making it easier to remove the bit.
Freezer Method: Place the chuck in the freezer for about 30 minutes. The cold can cause the metal to contract, making it easier to release the bit.
5. Drilling Out the Bit
If other methods fail, you may need to drill out the bit:
Use a Larger Bit: Select a drill bit that is slightly larger than the stuck bit and carefully drill it out.
Be Cautious: Proceed slowly to avoid damaging the surrounding material.

Safety Precautions
Wear Protective Gear: Always wear safety goggles and gloves to protect yourself from flying debris.
Secure the Workpiece: Ensure the workpiece is firmly clamped to prevent movement.
Work in a Well-Ventilated Area: This helps avoid inhaling any dust or fumes generated during the extraction process.
When to Seek Professional Help
If all else fails, it's best to seek professional help. A qualified mechanic or engineer can use specialized tools and techniques to remove the stuck drill bit safely and effectively.


