


Drilling a hole in a large rock requires the right tools, techniques, and safety measures. Here's a detailed guide based on the latest methods and tools available:
Preparation and Safety
1.Select the Right Tools:
Use a carbide-tipped masonry bit or a diamond drill bit designed for rock drilling. These bits are engineered to withstand the hardness of rock.
A hammer drill or rotary hammer drill that provides both rotation and percussive action is ideal for drilling through rock.
2.Gather Safety Gear:
Wear safety glasses to protect your eyes from flying debris.
Use work gloves for a firm grip and hand protection.
Consider hearing protection due to the noise generated.
3.Mark the Spot:
Clearly mark the desired location for the hole on the rock surface.
4.Secure the Rock:
Ensure the rock is stable and won't shift during drilling. You can use clamps or secure it in a stable position.
5.Prepare for Cooling:
If drilling a deep hole, have a water source nearby for cooling the bit and suppressing dust.
Starting the Hole
1.Position the Bit:
Place the tip of the drill bit on your marked spot.
2.Begin Drilling:
Start drilling at a slow speed with light, consistent pressure. Engage the hammer function from the beginning to help break down the rock. Drilling too fast initially can cause the bit to skate across the surface or overheat quickly.
3.Maintain Pressure:
As the bit begins to penetrate the rock, maintain a steady grip and continue applying consistent pressure. Avoid pushing too hard to prevent damaging the bit or overloading the drill motor.
Drilling and Progress
1.Continue Drilling:
Once the hole is initiated, continue drilling at a moderate speed with consistent, firm pressure.
2.Clear Debris:
Periodically withdraw the drill bit slightly to allow dust and debris to escape the hole. If using water for cooling and dust suppression, apply it gently around the drilling area. The water will help to keep the bit cool, prolonging its life, and will bind the rock dust, preventing it from becoming airborne.
3.Inspect the Bit:
Check the bit tip for any signs of damage or excessive wear.
Finishing the Hole
1.Withdraw the Bit:
Slowly withdraw the bit while it's still rotating to clear any remaining debris.
2.Inspect the Hole:
Ensure the hole is clean and the correct size. If the hole needs to be a specific diameter, you may need to use progressively larger drill bits, starting with a smaller pilot hole and gradually increasing the size.

Additional Tips
Cooling and Lubrication:Using water to cool the drill bit and reduce dust can be helpful.
Avoid Forcing the Bit:Drilling in rock is inherently slow, especially in hard formations. Take your time and let the drill do the work.
Clean Out the Hole:Use a shop vacuum to remove dust and masonry chips before using the hole for any purpose.
Drilling Methods for Large Rocks
Percussive Drilling: Effective for soft to medium-hard rocks like limestone.
Rotary Drilling: Suitable for deeper holes and larger projects.
Down-The-Hole (DTH) Drilling: Highly efficient for hard rock and deep holes.
By following these steps and using the appropriate tools, you can effectively and safely drill through large rocks. Always prioritize safety by wearing protective gear and adhering to proper drilling procedures.
how to drill a hole in slate rock
Drilling a hole in slate rock requires the right tools and techniques to ensure success and minimize the risk of cracking or chipping the slate. Here's a detailed guide on how to do it effectively:
Tools and Materials Needed
Diamond-Tipped Drill Bit: Ideal for drilling through hard materials like slate.
Carbide-Tipped Masonry Bit: Another option for drilling through slate.
Rotary Hammer Drill or Hammer Drill: Provides both rotation and percussive action, suitable for drilling through rock.
Safety Gear: Safety glasses, gloves, and a dust mask.
Water Source: For cooling the bit and suppressing dust.
Piece of Wood: To use as a backer to avoid breaking the slate.
Step-by-Step Guide
Preparation
1.Mark the Spot: Clearly mark the desired location for the hole on the slate surface using a pencil, chalk, or masking tape.
2.Secure the Slate: Place the slate on a solid piece of wood to provide support and prevent cracking.
3.Prepare for Cooling: Have a water source nearby to keep the drill bit cool and reduce dust.
Starting the Hole
1.Position the Bit: Place the tip of the drill bit on your marked spot.
2.Begin Drilling: Start drilling at a slow speed with light, consistent pressure. Avoid using the hammer function if your drill has it.
3.Maintain Pressure: Let the bit do the work without forcing it to prevent chipping or shattering.
Drilling and Progress
1.Continue Drilling: Once the hole is initiated, continue drilling at a moderate speed with consistent, firm pressure.
2.Clear Debris: Periodically withdraw the drill bit slightly to allow dust and debris to escape the hole. Apply water to the drill site to keep the bit cool.
3.Inspect the Bit: Check the bit tip for any signs of damage or excessive wear.
Finishing the Hole
1.Withdraw the Bit: Slowly withdraw the bit while it's still rotating to clear any remaining debris.
2.Inspect the Hole: Ensure the hole is clean and the correct size.

Additional Tips
Cooling and Lubrication: Using water to cool the drill bit and reduce dust can be helpful.
Avoid Forcing the Bit: Drilling in slate is inherently slow. Take your time and let the drill do the work.
Clean Out the Hole: Use a shop vacuum to remove dust and masonry chips before using the hole for any purpose.
Shaping and Cutting Slate
Wet Saw with Diamond Blade: For straight cuts, a wet saw with a diamond blade is highly effective.
Angle Grinder with Diamond Cup Wheel: For grinding or smoothing the edges of slate slabs.
By following these steps and using the appropriate tools, you can effectively and safely drill through slate rock. Always prioritize safety by wearing protective gear and adhering to proper drilling procedures.
how to drill a hole into a small rock
Drilling a hole into a small rock can be done with the right tools and techniques. Here's a detailed guide to help you through the process:
Tools and Materials Needed
Dremel Rotary Tool or Similar: A versatile tool suitable for drilling small holes in rocks.
Diamond Drill Bit: A small diamond drill bit (e.g., 1.25 mm) is ideal for drilling small holes.
Water Container: A shallow container filled with water to submerge the rock.
Safety Gear: Safety glasses and a dust mask.
Marker Pen or Chinagraph Pencil: To mark the spot where you want to drill.
Towel: To clean up water and debris.
Step-by-Step Guide
Preparation
1.Mark the Spot: Clearly mark the desired location for the hole on the rock surface using a marker pen or Chinagraph pencil.
2.Secure the Rock: Place the rock in a shallow container filled with water. The water level should be about 1 cm above the rock. This helps in cooling the bit and reducing dust.
3.Insert the Bit: Secure the diamond drill bit into the Dremel's chuck.
Starting the Hole
1.Adjust the Speed: Set the Dremel to a low speed, around 5,000 RPM.
2.Begin Drilling: Start drilling at a 45-degree angle to the rock surface. This helps in creating a pilot hole and prevents the bit from slipping.
3.Adjust the Angle: Once the pilot hole is established, adjust the bit to a 90-degree angle and continue drilling.
Drilling and Progress
1.Maintain Pressure: Apply gentle, consistent pressure and let the bit do the work. Avoid pressing too hard to prevent bit breakage.
2.Cooling: Periodically lift the bit to allow water to flow into the hole and clear debris. This helps in reducing heat and prolonging the life of the bit.
3.Inspect the Bit: Check the bit tip for any signs of damage or excessive wear.
Finishing the Hole
1.Withdraw the Bit: Slowly withdraw the bit while it's still rotating to clear any remaining debris.
2.Inspect the Hole: Ensure the hole is clean and the correct size.

Additional Tips
Cooling and Lubrication: Using water to cool the drill bit and reduce dust can be helpful.
Avoid Forcing the Bit: Drilling in rock is inherently slow, especially in hard formations. Take your time and let the drill do the work.
Clean Out the Hole: Use a shop vacuum to remove dust and masonry chips before using the hole for any purpose.
Safety Considerations
Personal Protective Equipment (PPE): Always wear safety glasses, ear protection, gloves, and dust masks.
Work Area: Ensure the rock is securely held in place to prevent movement. Clear the work area of any obstructions.
Electrical Safety: Be mindful of potential electrical hazards if using a corded drill with water for cooling.
By following these steps and using the appropriate tools, you can effectively and safely drill a hole into a small rock. Patience and precision are key to achieving a clean and accurate hole.
how to drill a hole in rock with hammer drill
Drilling a hole in rock with a hammer drill is a task that requires the right tools, techniques, and safety precautions. Here's a comprehensive guide to help you through the process:
Tools and Materials Needed
Drill: A hammer drill that provides both rotation and percussive action.
Drill Bit: Use a carbide-tipped masonry bit for sandstone or a diamond-tipped bit for harder rocks like granite.
Safety Gear: Safety glasses, work gloves, and hearing protection.
Water: For cooling the bit and reducing dust.
Clamp or Vise: To securely hold the rock in place.
Marker: To mark the drilling spot.
Step-by-Step Guide
1. Preparation and Safety
Mark the Spot: Clearly mark the desired location for the hole on the rock surface using a marker.
Secure the Rock: Place the rock in a clamp or vise to hold it firmly. This prevents the rock from moving during drilling.
Gather Safety Gear: Wear safety glasses to protect your eyes from flying debris, work gloves for a firm grip, and hearing protection due to the noise generated.
2. Starting the Hole
Position the Drill: Place the tip of the masonry bit on your marked spot.
Begin Drilling: Start the drill at a slow speed with light, consistent pressure. Engage the hammer function from the beginning to help break down the rock.Avoid pushing too hard to prevent damaging the bit or overloading the drill motor.
Cooling: Periodically dip the drill bit and the rock into water to keep them cool.
3. Drilling and Progress
Maintain Pressure: Continue drilling at a moderate speed with consistent, firm pressure.Periodically withdraw the drill bit slightly to allow dust and debris to escape the hole.
Check for Damage: Inspect the bit for any signs of wear or damage. Replace if necessary.
4. Finishing the Hole
Withdraw the Bit: Once you have reached the desired depth, reduce the pressure and slowly withdraw the bit while it's still rotating.
Inspect the Hole: Clean any debris from the hole and inspect it to ensure it meets your requirements.

Tips for Success
Start Slow: Begin with a slow speed to create a pilot hole and gradually increase the speed.
Use Water for Cooling: Water helps to cool the bit and reduce friction, preventing the rock from cracking.
Secure the Rock: Ensure the rock is stable to prevent it from moving during drilling.
Safety First: Always wear safety goggles and gloves to protect yourself from flying debris.
By following these steps and using the right tools, you can successfully drill a hole in rock with a hammer drill. Patience and precision are key to achieving clean and accurate results.
how to drill a hole into a rock wall
Drilling a hole into a rock wall can be a challenging task, but with the right tools and techniques, it can be done effectively. Here's a comprehensive guide based on the latest information:
Tools and Materials Needed
Drill: A hammer drill with a hammer function is essential for drilling into rock walls.
Drill Bit: Use a carbide-tipped masonry bit for softer rocks or a diamond-tipped bit for harder rocks like granite.
Safety Gear: Safety glasses, work gloves, and a dust mask.
Water: For cooling the bit and reducing dust.
Clamp or Vise: To securely hold the rock in place if drilling smaller rocks.
Marker: To mark the drilling spot.
Step-by-Step Guide
1. Preparation and Safety
Mark the Spot: Clearly mark the desired location for the hole on the rock wall using a marker.
Secure the Area: Ensure the rock wall is stable and secure. If drilling smaller rocks, use a clamp or vise to hold the rock firmly.
Gather Safety Gear: Wear safety glasses to protect your eyes from flying debris, work gloves for a firm grip, and a dust mask.
2. Starting the Hole
Position the Drill: Place the tip of the masonry bit on your marked spot.
Begin Drilling: Start the drill at a slow speed with light, consistent pressure. Engage the hammer function from the beginning to help break down the rock.Avoid pushing too hard to prevent damaging the bit or overloading the drill motor.
Cooling: Periodically dip the drill bit and the rock into water to keep them cool.
3. Drilling and Progress
Maintain Pressure: Continue drilling at a moderate speed with consistent, firm pressure. Periodically withdraw the drill bit slightly to allow dust and debris to escape the hole.
Check for Damage: Inspect the bit for any signs of wear or damage. Replace if necessary.
4. Finishing the Hole
Withdraw the Bit: Once you have reached the desired depth, reduce the pressure and slowly withdraw the bit while it's still rotating.
Inspect the Hole: Clean any debris from the hole and inspect it to ensure it meets your requirements.
Tips for Success
Start Slow: Begin with a slow speed to create a pilot hole and gradually increase the speed.
Use Water for Cooling: Water helps to cool the bit and reduce friction, preventing the rock from cracking.
Secure the Rock: Ensure the rock is stable to prevent it from moving during drilling.
Safety First: Always wear safety goggles and gloves to protect yourself from flying debris.
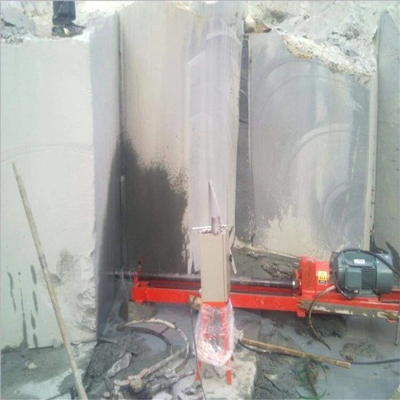
Additional Techniques
Rotary Drilling: This method is suitable for softer rocks and involves continuous rotation of the drill bit.
Rotary-Percussive Drilling: Combines rotation with percussive action, making it effective for harder rocks.
Down-the-Hole (DTH) Drilling: This method uses a hammer located directly behind the drill bit, delivering high-frequency impacts for efficient drilling in hard rock.
By following these steps and using the right tools, you can successfully drill a hole in a rock wall. Patience and precision are key to achieving clean and accurate results.
how to drill a hole polished rocks
Drilling holes in polished rocks, especially for jewelry or decorative purposes, requires precision and the right techniques to avoid damaging the stone. Here's a detailed guide on how to do it effectively:
Tools and Materials Needed
Drill: A rotary tool like a Dremel or a small drill press is ideal for precision.
Drill Bit: Use a diamond-tipped drill bit for polished rocks. Diamond bits are highly durable and can withstand the hardness of the rock.
Safety Gear: Safety glasses to protect your eyes from flying debris, work gloves for a firm grip, and a dust mask.
Water: A container of water to cool the bit and reduce dust, especially for deeper holes.
Clamp or Vise: To securely hold the rock in place.
Marker: To mark the drilling spot.
Step-by-Step Guide
1. Prepare the Work Area
Water Tray Preparation: Fill a container with enough water to completely submerge the rock. This acts as a lubricant and heat-sink, keeping the bit cool and prolonging its life.
2. Secure the Rock
Mark the Spot: Clearly mark the desired location for the hole on the polished rock surface using a marker.
Secure the Rock: Place the rock in a clamp or vise to hold it firmly. This prevents the rock from moving during drilling.
3. Set Up the Drill
Insert the Bit: Choose the appropriate diamond-tipped drill bit and insert it into the drill. Tighten the chuck securely.
Adjust the Drill: Set the drill to a low speed to start. This helps in creating a stable starting point.
4. Start Drilling
Position the Drill: Lower the drill bit to about 1/8 to 1/4 inch above the water level.
Begin Drilling: Start the drill at a low speed and gently lower the bit onto the marked spot. Apply light, consistent pressure.
Cooling: Periodically dip the drill bit and the rock into the water to keep them cool.
5. Drilling and Progress
Maintain Pressure: Continue drilling at a moderate speed with consistent, firm pressure. Periodically withdraw the drill bit slightly to clear debris.
Check for Damage: Inspect the bit for any signs of wear or damage. Replace if necessary.
6. Finishing the Hole
Withdraw the Bit: Once the hole is drilled to the desired depth, reduce the pressure and slowly withdraw the bit while it's still rotating.
Inspect the Hole: Clean any debris from the hole and inspect it to ensure it meets your requirements.

Tips for Success
Start Slow: Begin with a slow speed to create a pilot hole and gradually increase the speed.
Use Water for Cooling: Water helps to cool the bit and reduce friction, preventing the rock from cracking.
Secure the Rock: Ensure the rock is stable to prevent it from moving during drilling.
Safety First: Always wear safety goggles and gloves to protect yourself from flying debris.
By following these steps and using the right tools, you can successfully drill a hole in polished rocks for various applications. Patience and precision are key to achieving clean and accurate results.


